This post is sponsored by Michaels Stores, but all opinions are my own.
When I spot a trend on the market, I love to find ways to get the look for less. Most of the time the only way to do this is to DIY it.
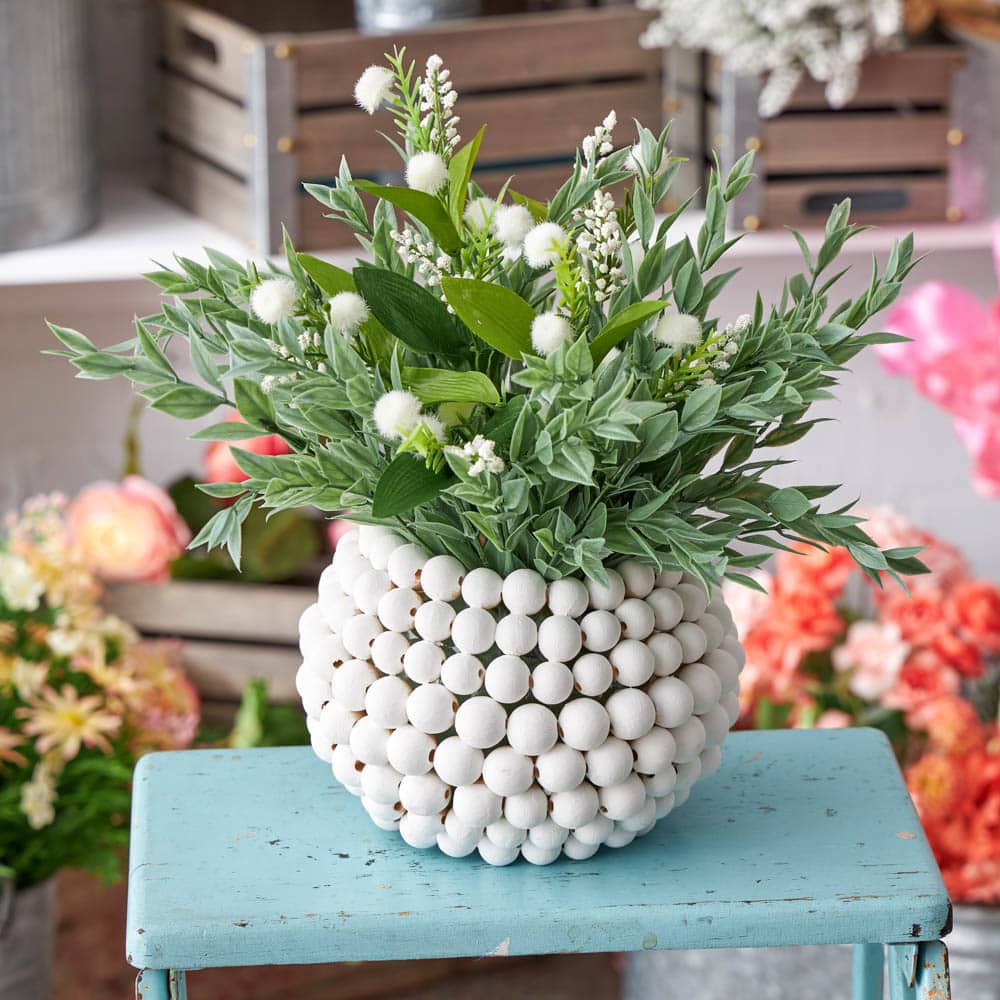
Ceramic beaded vases, bowls and platters are HUGE this season, but they are quite expensive running over $100 for a piece. That to me is insane, so I thought I would take this popular trend and make one for myself. I love it so much that I thought I would share how to make this DIY wood beaded vase tutorial with all the materials sourced from my favorite craft store Michaels!
One of my favorite things about Michaels is that they truly have everything I need for all my projects. Just when I think there is no way they could possibly have something, I turn the corner and spot it in the next aisle.
Michaels just launched their new Spring Decor Guide and I am so honored to be a part of it and have this project be featured in it. Make sure to check it out to get even more creative ideas for spring!

This beautiful wood beaded vase really fits into any design style, which is another reason this is such a great project for you. I can see this in a farmhouse garden home (like above) or in a space with a more modern feel where this would add lots of texture to the room.
It also is a great piece not just for spring. I can see adding beautiful greenery for the fall and winter months.
So let’s get started!
DIY Wood Beaded Vase Tutorial:
Materials Needed:
- Glass bowl
- Wood beads – I used 5 containers so I could use 1 size but you can use varying sizes and purchase less containers
- Wood filler (optional)
- Glue gun
- Hot glue
- White acrylic paint
- Paint brush
- Faux greenery
- Floral Foam

Instructions:
Step 1: Glue wood beads to bowl
Starting at the top of the glass bowl, begin to glue wood beads in a row. Make sure to have the holes facing the sides and not to the front. Work your way to the bottom creating horizontal rows with the beads. Use larger wood beads for the bottom rows.
TIP: Use hot glue with a strong adhesive like Gorilla Glue for maximum adhesion.
Step 2: Fill holes (optional)
Using wood filler, fill all exposed holes on the wood beads. Let dry according to instructions on the packaging.
Would you like to save this post?
Step 3: Paint Bowl
Once the holes have been filled and have completely dried, paint the bowl using white acrylic paint. Brushstrokes do not need to be perfect and can have a more messier look to resemble ceramic. Add additional layers of paint as needed to cover the surface of the balls thoroughly.
Let dry according to the package.
Step 4: Add floral foam
Cut floral foam to fit the inside of the beaded bowl and place it into the bottom of the bowl.

Step 5: Add faux greenery
Select beautiful faux greenery for your bowl. Cut stems in various sizes to create a full look. Stick stems into the foam block to keep them in place.

And that’s it my friends! Though the gluing of the wood beads takes some time, this could not be an easier project that gets you BIG design impact.

Don’t miss the other projects I have created in collaboration with Michaels this season and get your shopping lists together so you can have a crafting day!
Make sure to check out the new Michaels Spring Decor Guide and let me know what you are adding to your home for spring!
THIS IS A SPONSORED POST. A BLISSFUL NEST HAS RECEIVED PAYMENT, TRADE, AND/OR PRODUCTS FROM MICHAELS STORES IN EXCHANGE FOR PROMOTING. HOWEVER, ALL OPINIONS STATED ARE OUR OWN.

